
Cake Pop Recipe: Tips, Tricks & Decorating Ideas
In the delightful world of desserts, *cake pop recipes* stand out as both versatile and charming, captivating the hearts of sweet lovers everywhere. These bite-sized delights, which blend the richness of cake with the convenience of a lollipop, have evolved into a creative canvas for bakers and dessert enthusiasts alike. From festive gatherings to intimate celebrations, cake pops add a touch of whimsy and elegance, proving that great things indeed come in small packages. This article embarks on a comprehensive journey into the art of making cake pops, offering a step-by-step guide, professional tips, and creative variations to inspire your next baking adventure. Whether you’re a seasoned baker or a curious novice, prepare to dive into the sweet world of cake pops, where flavor meets fun in every bite.
Introduction to Cake Pops
The Origin of Cake Pops
Cake pops have taken the dessert world by storm. But where did they originate? And why have they become party staples worldwide?
Baker Angie Dudley, known as Bakerella, brought cake pops to fame in the late 2000s. She turned leftover cake scraps into decorated, bite-sized treats. This innovative approach to reducing waste and boosting creativity made cake pops a global sensation.
Why Cake Pops?
Cake pops win hearts with their adaptability. They suit any event, from lavish weddings to cozy home gatherings. You can tailor them to any theme, offering endless possibilities. Their size also allows for sweet indulgence without a full cake slice’s commitment.
But it’s not just looks that make cake pops irresistible. The blend of moist cake, rich frosting, and crisp chocolate shell offers a texture and flavor symphony. Whether you love classic chocolate, vanilla, or adventurous flavors, there’s a cake pop for you.
Getting Started
We’ll now dive into the essentials for making cake pops at home. You’ll learn about the ingredients and tools needed. Plus, we’ll walk you through the cake pop-making process, with tips for perfection. So, grab your apron, and let’s embark on this sweet journey!
Essential Ingredients and Tools
Creating cake pops is an art that requires both creativity and precision. To embark on this sweet journey, you’ll need a few key ingredients and tools. Let’s dive into what you’ll need to bring these delightful treats to life.
Ingredients for Success
- Flour: The foundation of any cake, providing structure.
- Cocoa Powder: For those irresistible chocolate cake pops.
- Buttermilk & Eggs: They add moisture and richness, ensuring a tender crumb.
- Sweeteners: Granulated sugar sweetens the deal, balancing the flavors.
These ingredients form the base of your cake pops, setting the stage for a delicious outcome.
Tools of the Trade
- Cake Pan: Essential for baking your cake base.
- Mixing Bowls & Mixer: For combining your ingredients smoothly.
- Cake Pop Sticks: They transform your cake balls into pops.
- Melting Chocolate: It coats your cake pops, adding a crisp shell.
With these tools and ingredients, you’re well on your way to creating mouthwatering cake pops.
Mixing It Up
Start by combining your dry ingredients, ensuring they’re well mixed. Then, gradually incorporate the wet ingredients, aiming for a smooth batter. This step is crucial for a uniform cake texture.
Baking Basics
Pour your batter into a greased cake pan, smoothing the top. Bake until a toothpick comes out clean. Let your cake cool completely before moving on to the next steps. Patience here is key to perfect cake pops.
On to the Frosting
A rich frosting binds the cake crumbs, adding flavor and moisture. Beat your butter until creamy, then slowly add powdered sugar and cocoa powder. The result should be smooth and spreadable.
Assembly Line
Crumble your cooled cake into a bowl, then mix in the frosting. Roll the mixture into balls and chill them. This firm base is essential for dipping.
The Finishing Touch
Melt your chocolate, then dip each cake ball, ensuring a uniform coat. Decorate as desired, then let them set. This final step brings your cake pops to life, ready to dazzle and delight.
With these ingredients, tools, and steps, you’re all set to create cake pops that will impress at any gathering. Stay tuned for more tips and tricks in the next section, where we’ll explore variations and professional advice for making your cake pops stand out.
Step-by-Step Cake Pop Recipe
Diving into the world of cake pops, we find a process that’s as fun as it is flavorful. Let’s break down the steps to create these delightful treats, ensuring your cake pops are not just tasty but also show-stoppers at any event.
Preparing the Cake
- Mix Dry Ingredients: Start by whisking together your flour, cocoa powder (for chocolate lovers), baking soda, and a pinch of salt. This mixture ensures your cake has the right structure and flavor.
- Combine Wet Ingredients: In a separate bowl, blend the melted butter, eggs, and buttermilk. These ingredients add moisture and richness to your cake, making it deliciously tender.
- Merge the Mixtures: Slowly incorporate the dry ingredients into the wet, mixing until just combined. Avoid overmixing to keep the cake light and fluffy.
- Bake to Perfection: Pour the batter into a prepared cake pan and smooth the top. Bake in a preheated oven until a toothpick inserted into the center comes out clean. Let the cake cool completely before moving on.
Making the Frosting
- Cream the Butter: Beat the butter until it’s smooth and creamy. This step is the base for a rich frosting.
- Sift in Sugar and Cocoa: Gradually add powdered sugar and cocoa powder, beating until the mixture is smooth. This creates a decadent frosting that’s perfect for binding the cake crumbs.
Assembling Cake Pops
- Crumble the Cake: Once cooled, crumble the cake into fine crumbs. This is where the fun begins!
- Bind with Frosting: Add the frosting to the cake crumbs, mixing until you achieve a dough-like consistency. This mixture should be moist enough to hold together when shaped.
- Shape and Chill: Roll the mixture into small balls, placing them on a baking sheet lined with parchment paper. Chill these in the freezer for a bit to firm up, making them easier to dip.
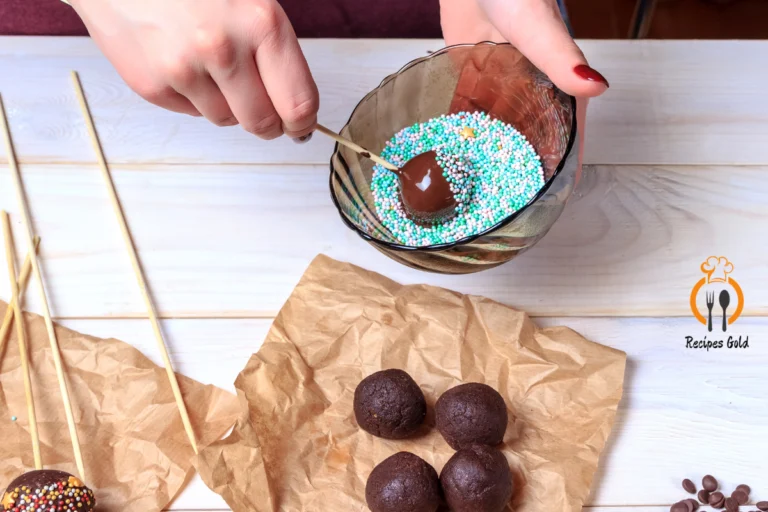
- Dip in Chocolate: Melt your chocolate or candy coating until smooth. Dip the tip of your cake pop stick into the chocolate, then insert it into a cake ball. Dip the cake ball into the chocolate, ensuring it’s completely covered.
- Decorate: Before the chocolate sets, sprinkle on your choice of decorations. This is your chance to get creative!
Tips for Success
- Temperature Matters: Make sure your cake balls are chilled before dipping. This helps the chocolate set quickly, creating a smooth finish.
- Smooth Dipping: Tap off any excess chocolate gently. This ensures a thin, even coating around each cake pop.
- Let Them Set: Place the dipped cake pops in a stand or styrofoam block to dry. This keeps them upright and prevents smudging.
Following these steps, you’ll create cake pops that are not just delicious but also visually appealing. Whether you’re making them for a party, as a gift, or just for fun, cake pops are a versatile treat that everyone will love. Stay tuned for the next part, where we’ll explore variations and professional tips to elevate your cake pop game even further.
Variations and Tips
After mastering the basic cake pop recipe, the real fun begins with customization. Let’s explore how to add variety to your cake pops and some professional tips to ensure they’re a hit every time.
Variations of Cake Pop Recipes
- Vanilla Cake Pops: Swap out the cocoa powder for more flour and add a teaspoon of vanilla extract for a classic vanilla flavor.
- Red Velvet Cake Pops: Incorporate a little bit of cocoa powder and red food coloring into your vanilla cake batter for a stunning red velvet cake pop.
- Funfetti Cake Pops: Stir sprinkles into your vanilla cake batter before baking for a festive, colorful treat.
Decorating your cake pops offers endless possibilities. Use different colors of melting chocolate, a variety of sprinkles, or even edible glitter to match the theme of any event or celebration.
Professional Tips for Perfect Cake Pops
- Consistency is Key: Ensure your cake and frosting mixture is moist enough to hold together but not so wet that it falls apart. This balance is crucial for forming perfect balls that stay on the stick.
- Chill Out: Chilling your cake balls before dipping is non-negotiable. It helps the chocolate coating set quickly and evenly.
- Double Dip for Drama: For a thicker chocolate shell or to change colors, let the first coating set before dipping again. This technique adds depth and texture to your cake pops.
- Decorate Smart: Add decorations while the chocolate is still wet so they adhere well. For designs requiring more precision, use a toothpick dipped in chocolate to “draw” on the cake pops.
Troubleshooting Common Cake Pop Challenges
- Cracked Coating: If your chocolate cracks after setting, it’s likely because the cake balls were too cold when dipped. Let them sit at room temperature for a few minutes before dipping next time.
- Falling Off the Stick: This usually happens if the cake ball is too heavy or the chocolate coating too thick. Make sure to tap off excess chocolate and don’t overload the cake ball with decorations.
Cake pops are a delightful treat that allows for creativity in both flavor and design. By following these variations and tips, you can elevate your cake pop game, impressing guests and satisfying sweet cravings. Whether you’re making them for a special occasion or just as a treat, cake pops are sure to bring smiles and joy to any gathering. Stay tuned for the next section, where we’ll dive into the frequently asked questions about cake pops, providing you with even more insights to perfect your cake pop creations.
FAQs
Cake pops, with their irresistible charm and endless possibilities for customization, often bring up questions from both novice and experienced bakers. Let’s tackle some of the most frequently asked questions to help you perfect your cake pop creations.
How Should I Store Cake Pops?
Store your cake pops in an airtight container. They can stay fresh at room temperature for up to a week. For longer storage, refrigerate them for up to two weeks. If you need to keep them longer, freezing is an option. Just wrap them individually in plastic wrap and store in a freezer bag.
What Chocolate Is Best for Coating Cake Pops?
Melting wafers or candy melts are ideal for coating cake pops. They melt smoothly and harden with a glossy finish. You can also use tempered real chocolate for a richer taste. Remember, the smoother the chocolate, the easier your dipping will be.
Can I Make Cake Pops in Advance?
Absolutely! Cake pops are a great make-ahead treat. You can prepare and freeze the cake balls without the sticks. When you’re ready to serve, thaw them slightly, dip in chocolate, decorate, and they’re ready to enjoy.
Why Do My Cake Pops Crack After Dipping?
Cracking usually occurs when there’s a significant temperature difference between the cake balls and the chocolate. To prevent this, avoid chilling the cake balls too much before dipping. Let them adjust to room temperature for a bit after coming out of the fridge or freezer.
How Can I Make My Cake Pops More Flavorful?
Infuse your cake or frosting with extracts, citrus zest, or liqueur replacements to add depth to the flavor. Mixing small pieces of fruit, nuts, or cookie crumbs into the cake mixture can also introduce interesting textures and tastes.
What’s the Best Way to Get a Smooth Coating?
Ensure your chocolate is at the right temperature: warm enough to be fluid but not so hot that it melts the cake balls. Dip the cake pop straight down and lift it out without swirling. Tap off the excess gently for a smooth, even coat.
Can I Use Boxed Cake Mix and Pre-Made Frosting?
Yes, for a quick and easy option, boxed cake mix and pre-made frosting work well. They provide a consistent result and save time, allowing you to focus on shaping and decorating your cake pops.
By addressing these common queries, you’re now equipped with the knowledge to tackle any cake pop challenge that comes your way. With a bit of practice and creativity, you’ll be whipping up batches of these delightful treats that are as beautiful as they are delicious. Stay tuned for the conclusion of our cake pop journey, where we’ll wrap up with some final thoughts and a call to action.
Conclusion and Call to Action
As we wrap up our comprehensive journey into the world of cake pops, it’s clear that these delightful treats offer more than just a bite-sized dessert option. They embody creativity, versatility, and the joy of baking, making them a perfect addition to any celebration or a sweet way to brighten an ordinary day.
Embrace the Joy of Cake Pops
Cake pops have shown us that with a few basic ingredients, some handy tools, and a sprinkle of creativity, you can create something truly special. Whether you stick to the classic chocolate cake pop or venture into more adventurous flavors and designs, the possibilities are endless. Remember, every cake pop is a canvas waiting for your unique touch.
Share the Sweetness
One of the best parts about making cake pops is sharing them with friends, family, or anyone who appreciates a sweet treat. They’re not just desserts; they’re conversation starters and smile-makers. So, next time you’re in the kitchen, consider whipping up a batch of cake pops to share. You might just make someone’s day a little brighter.
Keep Experimenting
The world of cake pops is vast and varied. Don’t be afraid to experiment with new flavors, techniques, and decorations. Each batch is an opportunity to learn something new and refine your skills. And remember, practice makes perfect. The more cake pops you make, the better they’ll get.
We Want to See Your Creations!
Now that you’re armed with the knowledge and inspiration to make your own cake pops, we’d love to see what you come up with. Share your creations on social media, tag us, and let the community of fellow bakers be inspired by your work. Your unique take on cake pops could be the next big hit!
Final Thoughts
Cake pops are more than just a trend; they’re a testament to the joy of baking and the endless creativity it allows. So, grab your apron, gather your ingredients, and start rolling, dipping, and decorating. The world of cake pops is yours to explore, and we can’t wait to see where your imagination takes you.
Happy baking, and remember, the sweetest moments in life are those shared with others. Let your cake pops be a bridge to those moments, creating memories that last long after the last crumb has been enjoyed.