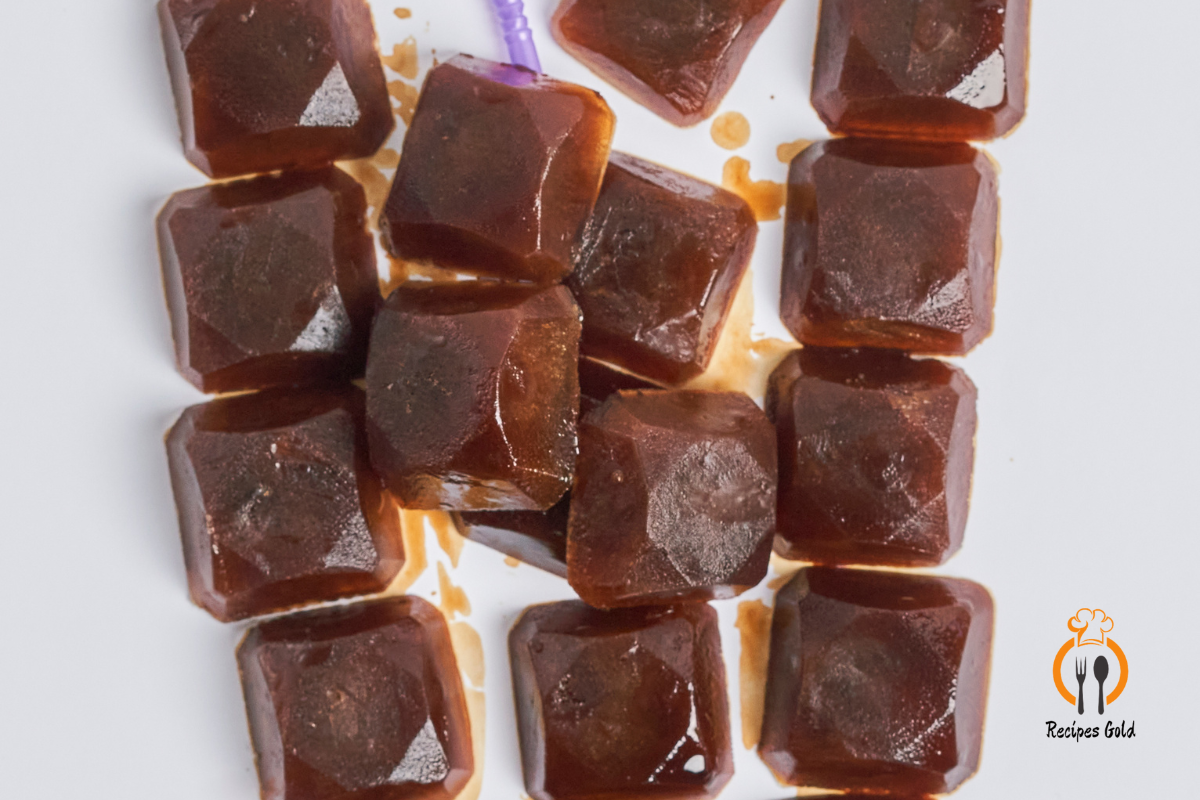
How to Make Ice Cube Chocolates: Your Ultimate Guide
In a world filled with culinary adventures, one might not immediately think of their humble ice cube tray as a gateway to gourmet delights. Yet, here we are, about to dive into the surprisingly creative and utterly delicious realm of ice cube chocolates. This article isn’t just about making chocolates; it’s about transforming the ordinary into the extraordinary with simple tools and ingredients. Whether you’re a seasoned chocolatier or a novice in the kitchen, these bite-sized treats are sure to impress. They are perfect for gift-giving, party favors, or a personal indulgence. Let’s embark on this chocolate journey. We’ll uncover the secrets to crafting these delightful confections, troubleshoot common pitfalls, and explore variations that’ll make your creations stand out. Ready your ice cube trays; it’s time to make some chocolate magic.
Introduction to Making Ice Cube Chocolates
The Charm of Ice Cube Chocolates
Ah, ice cube chocolates — the epitome of culinary creativity and simplicity. Who would’ve thought that the modest ice cube tray in your freezer could serve as the mold for delicious homemade chocolates? Well, brace yourself, because we’re about to turn that thought into a mouth-watering reality.
Starting Your Journey: How to Make Ice Cube Chocolates
Making ice cube chocolates is not just about melting chocolate and pouring it into molds; it’s an art form. It’s about experimenting with flavors, playing with textures, and unleashing your inner chocolatier. The beauty of this process is its simplicity, coupled with the endless possibilities for customization.
Why Ice Cube Trays?
But why choose ice cube trays? For starters, they’re incredibly accessible and versatile. With various shapes and sizes available, you can create chocolates that are not only delicious but also visually appealing. Plus, using ice cube trays means you don’t need specialized candy molds, making this a budget-friendly venture into homemade candy making.
Embarking on Your Chocolate Making Journey
So, whether you’re looking to whip up a quick treat for a holiday party, craft personalized gifts for your loved ones, or simply indulge in a chocolate-making adventure, ice cube chocolates are your go-to. They’re exceptionally great for those moments when you need a chocolate fix without the hassle of complex recipes or techniques.
Now, let’s get into the nitty-gritty of making these delightful treats. From the essential ingredients and tools you’ll need, to a step-by-step guide that’ll walk you through the process, we’ve got you covered. And should you encounter any hiccups along the way, fear not! We’ll also delve into troubleshooting common issues, ensuring your chocolate-making journey is smooth sailing.
So, gather your ingredients, and let’s make some chocolate magic happen. After all, who can resist the allure of homemade chocolates, especially when they’re as easy and fun to make as ice cube chocolates?
Essential Ingredients and Tools
What You Need to Make Ice Cube Chocolates
At the heart of ice cube chocolates lies a simple yet flexible ingredients list. You’ll need:
- Chocolate Chips: Choose dark or milk, depending on your preference. Dark chocolate offers a rich, intense flavor, while milk chocolate brings a creamy, sweet taste.
- Coconut Oil: This helps smooth out the chocolate, making it easier to work with. It also adds a slight hint of coconut flavor that pairs wonderfully with chocolate.
- Assorted Fillings: Here’s where you can get creative. Think peanut butter, shredded coconut, nuts, caramels, or even mini marshmallows. The sky’s the limit!
Tools and Equipment
The tools you’ll need are surprisingly minimal, making this project accessible to everyone:
- Ice Cube Trays: The star of the show. Silicone trays work best for easy chocolate removal, but standard plastic ones will do just fine.
- Microwave-Safe Bowl: For melting the chocolate. A glass bowl is ideal, as it retains heat well, ensuring the chocolate stays melted longer.
- Cooking Spray: A quick spritz prevents the chocolates from sticking to the trays, ensuring they pop out easily once set.
Preparing Your Workspace
Before diving into the chocolate-making process, it’s crucial to prepare your workspace. Make sure all your ingredients are measured and your tools are within reach. A clean, organized space not only makes the process smoother but also more enjoyable.
The Importance of Quality Ingredients
When it comes to making chocolates, the quality of your ingredients can make a significant difference in the final product. Opting for high-quality chocolate chips and fillings will result in a more delicious and satisfying treat.
Now that we’ve covered the essential ingredients and tools, you’re well on your way to making delightful ice cube chocolates. Stay tuned for the next part, where we’ll walk you through the step-by-step guide to bringing these tasty treats to life. Remember, the key to great chocolate making is not just following the recipe but also adding a dash of love and a sprinkle of creativity. Let’s get ready to melt, pour, and indulge in the sweet world of homemade chocolates!
Step-by-Step Guide
How to Make Ice Cube Chocolates: A Detailed Guide
The journey to delicious ice cube chocolates begins with melting the chocolate. Here’s how to do it right:
- Combine Chocolate and Oil: In your microwave-safe bowl, mix the chocolate chips with coconut oil. This duo ensures a smooth, pourable consistency.
- Microwave to Melt: Heat the mixture in the microwave for 60 to 90 seconds. Pause every 30 seconds to stir, preventing any hotspots that could burn the chocolate.
Filling the Trays
With your chocolate melted, it’s time to fill those trays:
- Spray the Trays: Lightly coat your ice cube trays with cooking spray. This step is a lifesaver for later when you’re popping out the chocolates.
- First Chocolate Layer: Pour chocolate into each cube, filling about one-third full. This creates the bottom of your chocolate.
- Freeze to Set: Place the trays in the freezer for about 2 minutes. This quick chill helps the chocolate set slightly, making it easier to add fillings.
Adding Fillings and Final Layer
Now, let’s get to the fun part — fillings!
- Choose Your Fillings: Add about 1 teaspoon of your chosen filling to each chocolate cube. Whether it’s a dollop of peanut butter or a few nuts, keep it centered.
- Cover with Chocolate: Fill the rest of the cube with melted chocolate, covering the filling completely.
- Tap to Settle: Gently tap the trays on the counter. This action helps remove any air bubbles and ensures the fillings are fully encased in chocolate.
Freezing and Unmolding
The final steps are all about patience and precision:
- Freeze Until Hard: Put the trays back in the freezer and wait for about 1 hour or until the chocolates are fully set.
- Unmold: Remove the trays from the freezer and let them sit for 5 minutes at room temperature. Then, gently twist the trays or push the bottom of each cube to release the chocolates.
Decorating Your Chocolates
For those who want to add a touch of elegance:
- Drizzle with White Chocolate: Melt some white chocolate and use a fork to drizzle it over your chocolates.
- Add Toppings: Before the drizzle sets, sprinkle on some holiday sugar decorations or crushed nuts for extra flair.
Congratulations! You’ve now mastered the art of making ice cube chocolates. But what if something goes awry? In the next part, we’ll explore troubleshooting common issues to ensure your chocolate-making adventures are always a success. Remember, the key to perfect chocolates is not just in the making but in enjoying the process and the delicious results. Let’s keep the chocolate magic alive!
Tips and Tricks
Making ice cube chocolates can be as smooth as the chocolate itself, but a few pro tips can elevate your treats from good to gourmet. Let’s dive into some expert advice to perfect your chocolate creations.
Choosing the Right Chocolate
- Quality Matters: High-quality chocolate chips melt better and taste superior. Look for brands with a higher cocoa content for dark chocolate and creamy textures for milk chocolate.
- Experiment: Don’t shy away from trying different types of chocolate. Each variety brings its unique flavor profile, adding depth to your chocolates.
Filling Varieties and Ideas
- Balance Flavors: When selecting fillings, consider the chocolate’s sweetness. Pair sweeter chocolates with salty or tart fillings for a delightful contrast.
- Size and Texture: Ensure your fillings are small enough to fit comfortably within the cube and complement the chocolate’s texture. Crunchy, creamy, or chewy – the choice is yours!
Storage and Serving Suggestions
- Keep Cool: Store your chocolates in an airtight container in the fridge to maintain their shape and freshness.
- Serving: Bring them to room temperature before serving. This enhances their flavor and texture, making them even more irresistible.
Personal Touches
- Customize: Personalize your chocolates with unique fillings or decorations. Consider the preferences of those you’re making them for – a thoughtful touch that doesn’t go unnoticed.
- Presentation: Serve your chocolates on a decorative plate or in a gift box. A beautiful presentation makes your treats even more special.
Troubleshooting Common Problems
Even the most experienced chocolatiers face challenges. Here are quick fixes for common issues:
- Chocolate Won’t Melt: Ensure you’re melting it gradually. If it seems too thick, add a bit more coconut oil.
- Chocolates Won’t Release: If they stick, let them sit at room temperature for a few minutes longer or gently run a knife along the edges.
Armed with these tips and tricks, your ice cube chocolates are bound to impress. But what if you still run into hiccups? No worries! The next part of our guide will focus on troubleshooting common issues, ensuring your chocolate-making journey is as smooth as the chocolates themselves. Remember, every chocolatier has their share of mishaps. It’s all part of the sweet adventure!
Troubleshooting Common Issues
Even with careful preparation and following recipes to the T, you might encounter some bumps along the way in your ice cube chocolate making journey. Fear not! Here’s how to tackle some of the most common issues, ensuring your chocolate endeavors are always a sweet success.
Chocolates Not Setting
- Too Warm: If your chocolates aren’t setting, your freezer might not be cold enough, or you haven’t left them in long enough. Give them more time, and ensure your freezer is set to the proper temperature.
- Ingredient Ratios: Too much coconut oil can prevent chocolates from setting. Double-check your measurements to ensure accuracy.
Difficulty Unmolding Chocolates
- Sticking to the Tray: If chocolates stick, let the tray sit at room temperature for a few minutes. Silicone trays can also be gently stretched to loosen the chocolates.
- Spray Sparingly: Overuse of cooking spray can make chocolates greasy. A light, even coat is all you need.
Fillings Spilling Out
- Overfilling: Ensure there’s enough chocolate to seal the filling inside. Leaving a bit of space at the top for the final chocolate layer is crucial.
- Seal Properly: After adding the filling, tap the tray gently to ensure no air gaps could lead to leaks.
Chocolate Appears Dull or Blooms
- Temperature Shock: Sudden changes in temperature can cause fat bloom, where the cocoa butter separates, giving the chocolate a whitish appearance. Try to keep temperature changes gradual.
- Moisture: Water is chocolate’s enemy. Ensure all tools and the ice cube tray are completely dry before starting.
Tips for Perfection
- Patience is Key: Rushing the process can lead to mistakes. Take your time at each step, especially when melting and setting the chocolates.
- Quality Over Everything: Using high-quality ingredients not only improves taste but also the overall outcome of your chocolates.
By keeping these troubleshooting tips in mind, you’ll be well-equipped to handle any hiccups that come your way. Remember, making ice cube chocolates is not just about the end product; it’s about the fun and creativity involved in the process. So, embrace the mishaps, learn from them, and most importantly, enjoy the journey.
In our next and final part, we’ll wrap up with some final thoughts and encouragement to keep exploring the delicious world of homemade chocolates. Stay tuned, and keep those chocolate cravings alive!
Frequently Asked Questions
As we near the end of our chocolate-making journey, it’s time to address some frequently asked questions about making ice cube chocolates. These queries pop up often, shedding light on common curiosities and concerns among budding chocolatiers.
Can I Use Other Oils Besides Coconut Oil?
- Absolutely! While coconut oil is preferred for its subtle flavor and solidifying properties at room temperature, you can substitute it with vegetable shortening or even butter in a pinch. Each alternative might slightly alter the texture or taste, so experiment to find your perfect match.
Can Baking Chocolate Substitute for Chocolate Chips?
- Yes, it can. Baking chocolate, available in both sweetened and unsweetened varieties, offers a more intense chocolate flavor. Remember to adjust the sweetness of your chocolates accordingly, especially if you’re using unsweetened baking chocolate.
Do I Need to Spray Silicone Ice Cube Trays?
- Silicone trays are naturally non-stick, making them easier to work with than plastic ones. While it’s not always necessary to spray them, a light coating can further ensure a smooth release of your chocolates.
How Can I Make My Chocolates Look More Professional?
- Focus on the finish and presentation. Drizzling with a contrasting chocolate or adding a sprinkle of sea salt or edible gold dust can elevate the appearance. Also, ensure your chocolates are uniformly sized for that professional touch.
Why Do My Chocolates Have a Grainy Texture?
- A grainy texture usually results from sugar or fat crystallization, which can happen if the chocolate overheats or if moisture gets into the mix. Melt your chocolate slowly and avoid any water contact for a smoother texture.
Can I Add Liquids to My Chocolates for Flavoring?
- Exercise caution with liquids; even a small amount of water can cause chocolate to seize and become unworkable. For flavorings, opt for oil-based extracts, liqueurs, or powders that won’t introduce moisture.
How Long Can I Store Ice Cube Chocolates?
- Properly stored in an airtight container in the refrigerator, your chocolates can last up to two weeks. For longer storage, consider freezing them, though this may affect texture slightly upon thawing.
With these FAQs addressed, you’re now equipped with a deeper understanding and ready to tackle your chocolate-making adventures with confidence. Remember, every question you ask is a step closer to mastering the art of chocolate.
In our final part, we’ll conclude with some parting thoughts and a dash of encouragement to inspire your continued exploration in the world of homemade chocolates. Keep those trays ready; your sweetest creations are yet to come!
Conclusion and Final Thoughts
As we wrap up our comprehensive guide to making ice cube chocolates, let’s take a moment to reflect on the journey we’ve embarked on together. From the simplicity of gathering ingredients to the joy of unmolding your very own handmade chocolates, this process is more than just a recipe—it’s an invitation to explore your creativity and indulge in the sweet rewards of your labor.
Embrace the Adventure
Making chocolates at home, especially with something as accessible as ice cube trays, demystifies the art of chocolate making. It proves that with a bit of ingenuity and basic kitchen tools, you can create treats that rival those found in gourmet shops. Embrace this adventure, knowing that each batch of chocolates is a reflection of your personal taste and creativity.
The Joy of Sharing
One of the most rewarding aspects of making ice cube chocolates is the opportunity to share your creations with friends and family. Whether it’s a thoughtful handmade gift or a delightful surprise for a casual gathering, your chocolates are sure to bring smiles and joy. Remember, it’s the thoughtfulness and love infused into each piece that makes them truly special.
Becoming a Pro at Making Ice Cube Chocolates
The world of chocolate is vast and varied. Don’t be afraid to experiment with different flavors, fillings, and decorations. Each attempt is a learning experience, bringing you closer to mastering the craft. And, if you encounter any hiccups along the way, remember that troubleshooting is part of the fun. It’s through overcoming these challenges that we grow as cooks and creators.
Final Encouragement
As we conclude, I encourage you to keep your ice cube trays and chocolate supplies ready for your next chocolate-making session. The techniques and tips shared here are just the beginning. There’s a whole world of flavors and textures waiting to be explored. So, keep experimenting, keep enjoying, and most importantly, keep sharing the chocolate love.
Making ice cube chocolates is more than just a culinary activity; it’s a way to express creativity, share happiness, and enjoy the simple pleasures of life. So, here’s to many more batches of delightful chocolates and the sweet moments they bring. Happy chocolate making!
Thank you for joining me on this delicious journey. May your chocolates be as sweet as the memories you create while making them.